Thursday 17 December 2015

Windows - Easiest way to install Telnet Client

Sometimes its confusing on Windows from version to version, how to enable TELNET.
The easiest was to install Telnet Client is from the command line.

Steps:
  1. Open command prompt. (Windows Key + R, to bring up the Run window -> Type cmd in the run window -> Click Ok
  2. In the Command Prompt window type the following command:
  3.  pkgmgr /iu:"TelnetClient"
If the User Account Control dialog box appears, confirm that the action it displays is what you want, and then click Continue.

When the command prompt appears again, the installation is complete.

Wednesday 18 November 2015

C# - Easiest CSV parser built in .NET Framework

Today it came to my surprise to know that there is a built in CSV parser in the .NET Framework library. Throughout the years, I have written many CSV parsers myself; but if I knew about this hidden parser, I might not have written any by myself.
Its hidden inside "Microsoft.VisualBasic" namespace.

Below is a sample usage of the class and methods to read a file "Person.csv".
In the sample, the line commenting character is "#"; the delimiting character is ",".
The class exposes property to configure delimiting character (comma in our sample) and comment token (# in our sample).
Any field which are enclosed within double quotes will escape delimiting characters and double quotes within the data field. It beautifully handles with by just setting the HasFieldsEnclosedInQuotes property to true.

using Microsoft.VisualBasic.FileIO;

var path = @"C:\Person.csv"; // Habeeb, "Dubai Media City, Dubai"
using (TextFieldParser csvParser = new TextFieldParser(path))
{
 csvParser.CommentTokens = new string[] { "#" };
 csvParser.SetDelimiters(new string[] { "," });
 csvParser.HasFieldsEnclosedInQuotes = true;

 // Skip the row with the column names
 csvParser.ReadLine();

 while (!csvParser.EndOfData)
 {
  // Read current line fields, pointer moves to the next line.
  string[] fields = csvParser.ReadFields();
  string Name = fields[0];
  string Address = fields[1];
 }
}

The parser has many more options. It can read a complete line as a single string. It can even read the remaining file content as a single string as well if needed in any case.

I will definitely rely on this parser rather than writing my own again.

Thursday 20 August 2015

SQL Server - Disable Identity Insert temporarily and enable back

At times, you might want to Disable SQL Server Identity Insert in order to insert some records with ids our of series and after the inserts are done you want to enable back the identity insert.
Find the code snippet below which lets you do it for SQL Server:
SET IDENTITY_INSERT <TableName> ON

-- Insert into the table <TableName> with the ids you prefer.

SET IDENTITY_INSERT <TableName> OFF

SET IDENTITY_INSERT ON allows explicit values to be inserted into the identity column of a table.

Friday 31 July 2015

SQL Server - Management Studio (SSMS) - Saving Changes is not Permitted

When I try to save changes to edit columns in a table and the change is very straight forward like
  • converting the type from int to long or 
  • changing the column name,
SSMS doesn't allow that. This happens even when the table has no data. Thus I am forced to drop the table and recreate it. The error I receive from SSMS (Sql Server Management Studio) while trying to save changes to data is:

"Saving changes is not permitted. The change you have made requires the following table to be dropped and re-created. You have either made changes to a table that can't be recreated or enabled the option prevent saving changes that require the table to be re-created."


Error Message from SQL Server Managemet Studio

This can be fixed by changing some options in SSMS.
Goto Menu
TOOLS > OPTIONS > DESIGNERS (in Options window)
Select the "Prevent saving changes that require table re-creation" option.


Now you are good to go. You can make changes to your table without the error message form SSMS.

SQL Server - Saving Changes is not Permitted

When I try to save changes to edit columns in a table and the change is very straight forward like
  • converting the type from int to long or 
  • changing the column name,
SSMS doesn't allow that. This happens even when the table has no data. Thus I am forced to drop the table and recreate it. The error I receive from SSMS (Sql Server Management Studio) while trying to save changes to data is:

"Saving changes is not permitted. The change you have made requires the following table to be dropped and re-created. You have either made changes to a table that can't be recreated or enabled the option prevent saving changes that require the table to be re-created."


Error Message from SQL Server Managemet Studio

This can be fixed by changing some options in SSMS.
Goto Menu
TOOLS > OPTIONS > DESIGNERS (in Options window)
Select the "Prevent saving changes that require table re-creation" option.


Now you are good to go. You can make changes to your table without the error message form SSMS.

Tuesday 26 May 2015

Delete partitions on USB Flash Drive

Today, I was using my USB Flash Drive on my MAC and had to format from MAC and accidently created a partition of 200MB. This made only 200MB accessible on my Drive usable from my windows machine. Even from Disk Management tool on windows, I couldn't do much to claim back my 16GB.
Finally Diskpart tool in windows came for my help.

Follow the below steps to delete all the partition on your drive and get back the full space to use:
  1. Open Command Prompt in Administrative mode (elevated mode).
  2. In the prompt, Type Diskpart
  3. In the prompt, Type List disk
  4. Note the disk number that corresponds to your USB drive (it should be obvious going by size)
  5. select disk X where X is the number from step 4
  6. In the prompt, Type list partition - There should be two, numbered 0 and 1, each about 7 GB
  7. In the prompt, Type select partition 0
  8. In the prompt, Type delete partition
  9. In the prompt, Type select partition 1
  10. In the prompt, Type delete partition
  11. In the prompt, Type create partition primary
  12. In the prompt, Type exit
  13. Exit Command Prompt (type exit or just close the window)
  14. In Windows, go to Computer and try to open the disk. It will ask you to format it.
  15. Format it with the default settings and give it a name if you want.
  16. It should now a single, unified partitioned drive.

Sunday 3 May 2015

C# - WebClient Authentication not working

Today I had a scenario where I was using WebClient class to POST XML to a particular Url.

Even after many trials, the authentication was not working fine.

Finally I had to do it the old fashion way of specifying the authorization credentials in the header.

This scenario happens because WebClient doesn't send the Authorization header untill it receives a 401 status.

The code that failed:

string xml = @"<messages>......</messages> ;
string url = new UriBuilder("http", "www.abc.com", 9443).ToString();

// create a client object
using (System.Net.WebClient client = new System.Net.WebClient())
{
client.Credentials = new NetworkCredential("user1", "password1");
// performs an HTTP POST
string resp = client.UploadString(url, xml);
txtResponse.Text = "Response:" + resp;
}


The workaround:

string xml = @"<messages>......</messages> ;
string url = new UriBuilder("http", "www.abc.com", 9443).ToString();

// create a client object
using (System.Net.WebClient client = new System.Net.WebClient())
{
client.Headers[HttpRequestHeader.Authorization] = "Basic " + Convert.ToBase64String(Encoding.Default.GetBytes("user1:password1"));
// performs an HTTP POST
string resp = client.UploadString(url, xml);
txtResponse.Text = "Response:" + resp;
}

Monday 20 April 2015

ASP.NET - Current Page Url with QueryString

You might need to extract different values from url.
It might be the path or the current page or values in the querystring.
Here is a simple reference to different uri based info available to you out of the box.

SAMPLE URL:
http://habeeb.in/UrlTest/Default.aspx?QueryString1=1&QueryString2=2

CODE:
Response.Write( Request.Url.Host );
Response.Write( Request.Url.AbsolutePath );
Response.Write( Request.ApplicationPath );
Response.Write( Request.Url.AbsoluteUri );
Response.Write( Request.Url.PathAndQuery );

OUTPUT:
habeeb.in
/UrlTest/Default.aspx
/UrlTest
http://habeeb.in/UrlTest/Default.aspx?QueryString1=1&QueryString2=2
/UrlTest/Default.aspx?QueryString1=1&QueryString2=2

The above sample "Request.Url" is when you use in ASP.NET Code behind.
If you use it within a class library then you will have to refer it as ""HttpContext.Current.Request.Url".

Sunday 12 April 2015

IIS - Restrict IP Address Range

Allowing and restricting visits from certain IPs or IP ranges can be easily done on IIS.
Working with a simple IP is easy. Working on an IP range is a bit more complicated.
We will discuss about it here. I will discuss about the restriction case and you can follow the same method for "Allow IP " case also.
Follow the below steps:
  1. Make sure "IP Security" feature is installed on your IIS server machine.

    • Goto Control Panel > On Left Pane select "Turn Windows features on or off".
    • On Windows Features window, select "IP Security" and click "OK".
    • Installing this you might be prompted for a reboot.

  2. Now browse to your website on IIS (Internet Information Services Management Services Console) and Open (Double Click) "IP Address and Domain Restrictions".

  3. Right Click > Select option "Add Deny Entry".

  4. Enter the IP Address Range and Subnet Mask to restrict.
    • In the above example all IPs in the range: 115.164.0.1 - 115.164.255.254 will be blocked.
    • To help you calculate the subnet mask, use the tool: http://www.subnet-calculator.com/subnet.php

Monday 30 March 2015

Visual Studio - Add JQuery Intellisense to ASP.NET Pages

There are multiple ways to enable intellisense for JQuery in Visual Studio.
I will lay down the steps for one of the methods.
  1. Add reference to the JQuery file.
    • <script src="http://ajax.aspnetcdn.com/ajax/jQuery/jquery-1.11.2.min.js"></script>
  2. Install the nuget package:
    • https://www.nuget.org/packages/jQuery-vsdoc/
    • This will add reference to the required js files to enable intellisense along with documentation for the intellisense.
    • By default, the nuget package manager will add the files to /Scripts/......
  3. Add reference to the above js files on your web page. There are multiple files in the Scripts folder, But only the one below is necessary. 
    • <% if (false){ %>
      <script src="Scripts/jquery-2.1.0-vsdoc.js"></script>
      <% } %>
    • As you see the script is added within server side code, with an if condition set to false.
    • This makes sure the vsdoc file (that enables intellisense) is not rendered to the client.
Following the above steps have enabled JQuery Intellisense on your webpage.

Happy Coding.

Wednesday 18 March 2015

TOAD for SQL Server - Auto Complete / Auto Replace new entry not working fix

Toad for SQL server is an alternative to SQL Server management Studio (SSMS). Its a free tool from Quest Software which is now part of DELL. Its still a debate among developers over which is the best SQL Management tool for SQL Server. We will not get into it today. Instead, for those of you who are using Toad for SQL Server we will check how to make most out of the tool.
Today we will look into AUTO REPLACE option in Toad, which can also be made use of as a work around for AUTO COMPLETE of custom code snippets.

For example, typing
"SSF" automatically expands to "SELECT TOP 100 * " and
"NL" to "WITH(NOLOCK)".
It would greatly increase your productivity. To achieve this we will make use of the AUTO REPLACE option in TOAD. But the problem is that in TOAD free version, you cannot make new AUTO REPLACE entries. A work around is to manually edit the template file for AUTO REPLACE.

Follow the below steps:


1) Get to the Options window from menu - Tools > Options.
Tools > Options

2) In the Options Window, go to Editor > Auto-Replace.
You can see the Auto Replace options available.
But if you try to add new it wouldn't get saved.
Auto Replace Editor Window
3) Browse to the folder: "C:\Program Files (x86)\Quest Software\Toad for SQL Server Freeware 6.5\Templates\CodeTemplates".
Toad Auto-Replace template folder

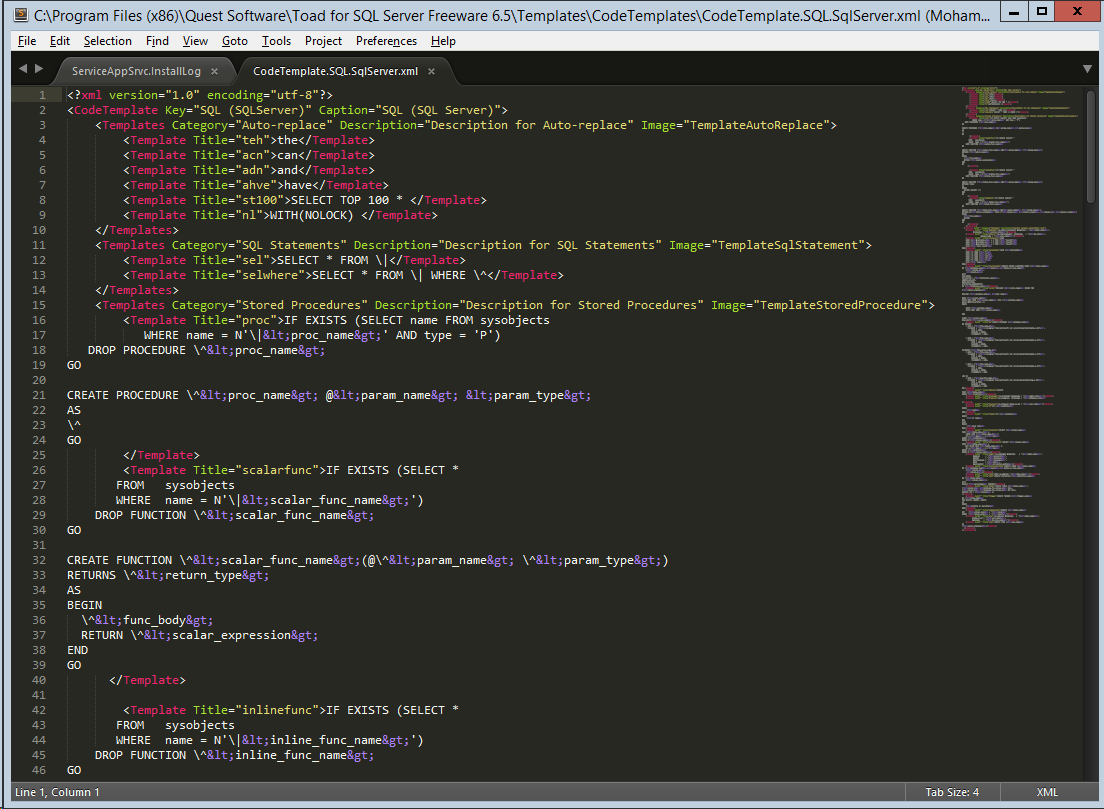
4) Open the SQL template file: CodeTemplate.SQL.SqlServer.xml.
You can add your auto complete snippets here.
Ex. Line 8 and 9:
<Template Title="st100">SELECT TOP 100 * </Template>
<Template Title="nl">WITH(NOLOCK) </Template>
From the above example typing NL will get replaced automatically by WITH(NOLOCK).
CodeTemplate.SQL.SqlServer.xml file
5) Restart Toad Editor and the new changes must start to work for you.

Happy Coding.....

Thursday 12 March 2015

Visual Studio 2013 - Missing Design View - Fixed

It was surprising for me not to find the Design | Split | Source options when I was editing HTML file in my Visual Studio 2013 editor.
Design | Split | Source Pane
This is because the HTML Editor in Visual Studio doesn't support this feature. Only Web Forms Editor supports the Design View.

Now the solution to our concern is to use Web Forms Editor to edit HTML files.

How to do this?

Follow the below steps:

  1. In Solution Explorer window, Right Click the HTML file -> Select Open With...
    Select Open With... for the HTML file from Solution Explorer
  2. In the Open With window, select HTML (Web Forms) Editor, click Set as Default and click OK.
From now all your HTML files will open by default with Web Forms Editor and it will have the Design View option

Happy coding

Tuesday 3 March 2015

Text Select in Adobe Acrobat Reader XI

Just now I was trying to copy some text from a PDF file which I was viewing using Adobe Acrobat Reader XI.

It was weird that I couldn't switch from the hand tool mode to the text selection mode. I checked all the menu options and it wouldn't let me do that.
Finally I got the "hidden" option. :)

Right Click on the text and the context menu gives you option to switch between Text "Select Tool" and "Hand Tool". It was that simple and I had to look around.

Saturday 28 February 2015

Red Gate SQL Prompt - Extend trial period for free

Get to user the full features of SQL Prompt for free?

This is a free little secret to extend the trial period of Red Gate SQL Prompt. Here you are given a new serial key. You will get to use the full features of the tool for another 14 days for free. After the second trial is over you can again attempt to use the technique to extend trial period again.

In SQL Server Management Studio, goto menu SQL Prompt -> Help -> Enter Serial Number. On the "Activate SQL Prompt" window, in the Serial number textbox enter the below text
I need more time
and click Activate button.


Your trial period is now successfully extended.

Tuesday 24 February 2015

Distinguish between USB2.0 and USB3.0

The easiest way to make out if the USB port on your laptop is USB 2.0 or USB 3.0, is to follow conventions. There are universal conventions followed by all hardware manufacturers that help you to tell which ports on your computer is 2.0 and which one is 3.0.

Facts: USB 3.0 is 10 times faster than USB 2.0, because it uses a technology called SuperSpeed.
Because of this USB 2 is called High Speed adn USB 3 is called SuperSpeed. This is also evident in the symbol used for USB 3 which has SS as part of the Symbol.

Below are the symbols for USB 2.0 and USB 3.0. You can check for these symbols near your laptop USB ports. You make out USB 2.0 and USB 3.0 by:
1) USB 2.0 port symbol is different from USB 3.0 symbol.
2) USB 3.0 port might have a blue tab in the ports
Either one of the above conventions would be used on your device.


USB 2.0 Symbol
USB 3.0 Symbol


USB 2.0
USB 2.0


USB 3.0

USB 3.0

Saturday 31 January 2015

ASP.NET C# - How to specify File Path

If you want to access a file with in an ASP.NET Application, you should specify the relative path to the file from the application root.
For example your file name is "StockConfig.xml" and its placed within a "Configs" folder.
Now you need to load the file; use the below code for this.
Server.MapPath("~/Configs/StockConfig.xml")
example usage:
xDoc.Load(Server.MapPath("~/Configs/StockConfig.xml"));
Here Server.MapPath, returns the physical path corresponding to the relative path you mentioned.
"~" specifies the application root. So any path you mention following "~" is relative to the application root folder.

In case you are trying to access "Server.MapPath()" from a class library, you will need to "Add Reference" System.Web assembly to your class library and use the code as below:
System.Web.HttpContext.Current.Server.MapPath("~/StockConfig.xml")