Tuesday 31 December 2013

DNN - NB_Store - Backoffice Pagination "Not Found" error

In the DotNetNuke - NB_Store Backoffice, whenever the list (example: catalog list) is longer to have a pagination, navigating to the new page gives exception with "Not Found" message.
This is the link to the catalog list :
http://mywebsite.com/BACK-OFFICE/ctl/AdminProduct/mid/..... 
When I click the "Next" or "2" (second page link), it gives the above mentioned exception.

This was the question I had asked on DNN NB_Store codeplex discussion forum:
http://nbstore.codeplex.com/discussions/473805
I am repeating it here with a temporary solution, so that I can also add screenshots here for better clarity.

Solution:
The catalog list link is as below:
http://mywebsite.com/BACK-OFFICE/ctl/AdminProduct/mid/475?SkinSrc=%2fDesktopModules%2fNB_Store%2fSkins%2fDark%2fDark
If you notice in the url, it has a parameter "SkinSrc" which has the path to the skin file. This basically overrides the default skin of your website.
If you click the "Next" page link at the bottom of the page, you will get an error as below:
This is the link to the next page:
http://sandapple.com/BACK-OFFICE/ctl/AdminProduct/mid/475/CatID/-1/currentpage/2?SkinSrc=/DesktopModules/NB_Store/Skins/Dark/Dark
You can get the next page by removing the "SkinSrc" parameter. This will show you the next page with the default skin of the website.

Monday 25 November 2013

Winforms - Update UI for Long running processes

If you have a long running process in your windows forms application you might try to update a message label in the UI to say "Processing. Please wait...". But as a matter or fact, the UI doesn't get updated till the process is completed. in this case it doesn't serve your purpose of notifying the user by updating a UI element.
private void btnAzerbaijanReportJob_Click(object sender, EventArgs e)
{
lblMessage.Text = "Please wait..";
IneedTime(); // Long running process.
lblMessage.Text = "Done.";
}
In the above case, lblMessage will never display the text "Please wait..", because IneedTime() method executes on the UI thread and UI will not be updated until IneedTime() methods finish executing.
To overcome this, there are 2 methods.
1) Run long running process (IneedTime() in the above code) in a separate thread. In case you dislike to make your app a multi thread app, you have a second option.
2) Second option is to force the UI to redraw the UI even before your long running method executes. For this you need to call the
Application.DoEvents() method. What this method does it that it will process all the windows messages currently in the message queue. So this queue will already have the paint message which was issued when we set the label (lblMessage) text.
private void btnAzerbaijanReportJob_Click(object sender, EventArgs e)
{
lblMessage.Text = "Please wait..";
Application.DoEvents();
IneedTime(); // Long running process.
lblMessage.Text = "Done.";
}
In case you see the UI is not updated as expected, you can also use the below code.
lbl.Invalidate();
lbl.Update();
Application.DoEvents();
or even
lbl.Refresh();
Application.DoEvents();
to redraw the label UI.

Monday 18 November 2013

Windows Phone - How to use Resource Files

Resource Files in Windows phone has the similar concepts as it was in Web Forms. It can be used for localization as well as store string values to be used across your apps. Resource files are a nice way to reduce hardcoding strings inside your application code.
The default resource file added to your solution when the project is created is "AppResources.resx" which is in the "Resources" folder at the root of your project folder hierarchy. This default file is called the "neutral language resource" because it is the fallback resource file even in localization scenarios.

Note: As in web forms and win forms, each culture has its own resource file, with the culture suffixed to the filename (AppResources.en-US.resx). We will discuss more on localization scenarios in another post.

Below is the code to dynamically bind your resource to XAML page element's properties.
"{Binding Path=LocalizedResources.ApplicationHeader, Source={StaticResource LocalizedStrings}}"
For example if we want to bind a string resource to the Text property of TextBlock Control:

<TextBlock Text="{Binding Path=LocalizedResources.ApplicationHeader, Source={StaticResource LocalizedStrings}}" />

Monday 4 November 2013

C# Remove Invalid filename characters from string

Ever wanted to remove invalid filename characters from a string while dealing with file related code?
Here is a pretty easy solution using C# Regex class.
The funda is to find any invalid character/characters from the string and remove it.
Here is the method which does the trick.
private static string GetValidFileName(string fileName)
{
// remove any invalid character from the filename.
return Regex.Replace(fileName.Trim(), "[^A-Za-z0-9_. ]+", "");
}
The code even preserves white spaces and removes only invalid special characters. The Regex patter can also be replaced by "[^a-zA-Z 0-9'.@]" A better solution which I prefer is using LINQ:
private static string GetValidFileName(string fileName)
{
return Path.GetInvalidFileNameChars().Aggregate(fileName, (current, c) => current.Replace(c.ToString(), string.Empty));
}
There is a solution mentioned in MSDN which personally I do not find very appealing.
static string CleanInput(string strIn)
{
 // Replace invalid characters with empty strings. 
 try {
    return Regex.Replace(strIn, @"[^\w\.@-]", "", 
       RegexOptions.None, TimeSpan.FromSeconds(1.5)); 
 }
 // If we timeout when replacing invalid characters,  
 // we should return Empty. 
 catch (RegexMatchTimeoutException) {
    return String.Empty;   
 }
}

Saturday 26 October 2013

Windows Phone - The name “LocalizedStrings” does not exist in the namespace

The name "LocalizedStrings" does not exist in the namespace

Today morning all of a sudden, my windows phone project that I had been working on for months started showing up this compile time error message at:
<Application.Resources>
    <local:LocalizedStrings xmlns:local="clr-namespace:Bins" x:Key="LocalizedStrings"/>
</Application.Resources>
It was not a show stopper as I was able to force VS2012 to ignore this error and continue with the build. But I some how wanted to take some time to fix the issue. The error message starting showing up after my machine had an unexpected crash. So the most probable reason for it is a corrupted file.
It was fixed by cleaning up some visual studio chach files.
Steps:

  1. Close Visual Studio.
  2. Go to the folder location : "%LOCALAPPDATA%\Microsoft\Phone Tools\CoreCon\".
  3. Delete the contents of the folders: 10.0 and 11.0.

Open up your project and compile. The error must have disappeared now.

Wednesday 23 October 2013

Windows 8 Essential Shortcuts

Agreed upon the fact that Windows 8 is a very Touch friendly OS, its not that partial to its keyboard fan boys either. Windows 8 has a very rich set of keyboard shortcuts to boost your productivity if your hands are resting upon keyboard most of the time. Below are a selected list of 15 shortcuts which I found useful.
Caution: All the shortcuts are Windows Key centric.

  1. Windows Key + C : Displays Charms menu.
  2. Windows Key + X : Brings up a menu of advanced system options, including Windows Control Panel, Command Prompt, Task Manager and File Explorer.
  3. Windows Key + I : Displays the Settings menu for the current app. For example, if you’re in Internet Explorer 10, this key shows Internet options. If you’re on the Start menu, it shows general OS settings.
  4. Windows Key + Q : Brings up the apps search menu that allows you to search your list of installed programs.
  5. Windows Key + D : Activates desktop mode.
  6. Windows Key + Tab : Brings up the Task Switcher and toggles between Windows 8-style apps.
  7. Windows Key + H : Brings up Share menu for the current app. For example, hitting Windows Key + H in Bing Maps, lets you email or share map information on social networks.
  8. Windows Key + M : Opens desktop mode and minimizes all windows.
  9. Windows Key + W : Opens universal search menu and sets it to search settings.
  10. Windows Key + F : Opens universal search menu and sets it to search files.
  11. Windows Key + R : Opens Run menu where you can launch programs by typing in their executable file names.
  12. Windows Key + E : Opens File Explorer to the “My Computer” view which shows all your drives.
  13. Windows Key + Number Key (1-9) : Switch to desktop mode and make the Nth application on the task bar active where N is the number key you hit and 1 is the furthest taskbar icon to the left.
  14. Windows Key + . (period key) : Docks the current Windows 8-style application to the right or left, depending on how many times you hit it.
  15. Windows Key + Z : Brings up app menu, which shows contextual options for the active app.
Happy keyboarding.

Monday 21 October 2013

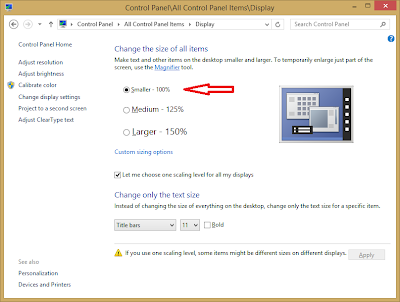
Windows 8.1 - Blurry Text Fix

My first sight of desktop after upgrading to Windows 8.1 Pro was very disappointing.
All the icons and fonts appeared blurry and weird on my decent resolution (1600x900) Lenovo Yoga 13 monitor. For a moment I regretted for having upgraded the OS without going through enough reviews online.
But there is no going back, I want the lastest OS update on my machine.
I "Binged" and could find this issue was reported since the preview release of Windows 8. But there was no proper resolution mentioned even on Microsoft forums (of course they are not the best knowledge centers). Finally determined to play around with the settings, the solution to the issue was pretty straight forward. I will reproduce the steps I followed:

Step 1) Right Click Desktop and click "Screen Resolution" from the menu.
Step 2) On the Screen Resolution Window, click the "Make text and other items larger or smaller" link.
Step 3) Select the "Let me choose one scale level for all my displays".
Step 4) Select "Smaller - 100%" option and click Apply.
It will prompt you for a re login and proceed with it. Hopefully this should fix your blurry text issue.
On the Screen Resolution Window, click the "Make text and other items larger or smaller" link
Select "Let me choose one scale level for all my displays". Select "Smaller - 100%" option.


Saturday 12 October 2013

WPF - How to use Hyperlink

Requirement:
Add a Hyperlink to WPF window/page; clicking on which should open up a web browser with the url assigned to the hyperlink.

Solution:
Add a Hyperlink control to your page. It need to be in a container like a TextBlock because the control cannot exist independantly. Handle the RequestNavigate event and do our custom actions required, in our case spawn a new process to open up a web browser to navigate to the specified url.
XAML
<TextBlock>          
    <Hyperlink NavigateUri="http://www.google.com" RequestNavigate="Hyperlink_RequestNavigate">
        Click here
    </Hyperlink>
</TextBlock>
Codebehind
private void Hyperlink_RequestNavigate(object sender, RequestNavigateEventArgs e)
{
    Process.Start(new ProcessStartInfo(e.Uri.AbsoluteUri));
    e.Handled = true;
}

Tuesday 24 September 2013

WPF - Difference between Page and Window

What is the difference between a Window and Page item in a WPF project?

Windows are independent and normal WPF application windows like Forms in WinForm Application.
A window can contain WPF Pages using Frame Container.

Pages on the other hand are intended for use in Navigation applications, where we can navigate between pages from within a Window. Examples of Pages are in Wizard kind of applications where each screen in a wizard can be a page, which are hosted within the main wizard window. Pages are hosted in NavigationWindows or Frames.


WPF - How to Read each line from a TextBox

To read each line from a TextBox control in WPF, we can use the below code snippet.
StringCollection type represents a collection of strings. The type is part of the namespace - System.Collections.Specialized. import the namespace in your code file:
using System.Collections.Specialized;
private StringCollection GetTextLines()
{
var lines = new StringCollection();
int lineCount = txtPlainTxt.LineCount;
for (int line = 0; line < lineCount; line++)
lines.Add(txtPlainTxt.GetLineText(line));
return lines;
}

The usage is straightforward as below:
Please note that each item of the StringCollection is a string holding each line of the TextBox.
// Usage
var lines = GetTextLines();
foreach (var line in lines)
{
// line is string with each line.
}

WPF - How to set Start Window

To set the Start window / page in a WPF app, we can configure it in App.xaml file.
In the "Application" element of App.xaml file in your project, set the "StartupUri" attribute to the xaml page you want to load first in the WPF Application.
In the below sample code "QuizTxt2XmlPage.xaml" is the start up page.

<Application x:Class="Quiz.WpfApp.App"
xmlns="http://schemas.microsoft.com/winfx/2006/xaml/presentation"
xmlns:x="http://schemas.microsoft.com/winfx/2006/xaml"
StartupUri="QuizTxt2XmlPage.xaml">

A reference screen shot is provided below:


Saturday 21 September 2013

SQL Server:Login failed for user 'sa'. (Microsoft SQL Server, Error: 18456)

Sometimes you can connect to MS SQL Server Management Studio with Windows Authentication but is unable to connect with SQL Server Authentication. You might get the below error message:

Login failed for user 'sa'. (Microsoft SQL Server, Error: 18456)
The most probable reason for this could be that when you first installed SQL Server and configured, you might have set the Server Authentication mode to Windows Authentication Mode only. Follow the below steps to solve this issue.

  1. Login to the MS SQL Server Management Studio with Windows Authentication. 
  2. In SQL Server Management Studio Object Explorer, right-click the server, and then click Properties. 
  3. In the Server Properties window, select "Security" under "Select a page" section. 
  4. Select the Server authentication as "SQL Server and Windows Authentication mode" and click Ok. 
  5. Restart the SQL Services and then try to login with 'sa' details.
Set Server Authentication mode to SQL Server and Windows

Restart MSSQL servies before trying to login again.

Thursday 5 September 2013

Windows Phone - How to use Resource Files

Resource Files in Windows phone has the similar concepts as it was in Web Forms. It can be used for localization as well as store string values to be used across your apps. Resource files are a nice way to reduce hardcoding strings inside your application code.
The default resource file added to your solution when the project is created is "AppResources.resx" which is in the "Resources" folder at the root of your project folder hierarchy. This default file is called the "neutral language resource" because it is the fallback resource file even in localization scenarios.

Note: As in web forms and win forms, each culture has its own resource file, with the culture suffixed to the filename (AppResources.en-US.resx). We will discuss more on localization scenarios in another post.

Below is the code to dynamically bind your resource to XAML page element's properties.
"{Binding Path=LocalizedResources.ApplicationHeader, Source={StaticResource LocalizedStrings}}"
For example if we want to bind a string resource to the Text property of TextBlock Control:
<TextBlock Text="{Binding Path=LocalizedResources.ApplicationHeader, Source={StaticResource LocalizedStrings}}" />

Wednesday 4 September 2013

Windows Phone - How to include ampersand (&) in the content of XAML elements like Combobox and TextBlock

/* XAML */
<ComboBox><ComboBoxItem> Awake & Alive</ComboBoxItem></ComboBox>
The above code throws exception :
Entity references or sequences beginning with an ampersand '&' must be terminated with a semicolon ';'.

The solution is to encode the special characters:
Use &amp; to encode the ampersand.
/* XAML */
<ComboBox><ComboBoxItem> Awake &amp; Alive</ComboBoxItem></ComboBox>
The same is applicable for other elements like TextBlock

Alternative:
/* XAML */
<ComboBox><ComboBoxItem><![CDATA[Awake & Alive]]></ComboBoxItem></ComboBox>
Explanation:
XAML being xml based, the xml parser when parsing an xml element, it also parses the text between XML tags, because XML elements can contain child elements.
CDATA indicated the text that should not be parsed by the XML parser. So any text that includes characters like '<' and '&' are to be included in CDATA, because these characters have special meaning in XML.
CDATA section starts with "<![CDATA[" and ends with "]]>"

Tuesday 6 August 2013

Windows Phone - Navigation from App.xaml.cs

To navigate to pages win windows phone app we use the Navigate method of NavigationService class:
NavigationService.Navigate(new Uri("/MyPage.xaml", UriKind.RelativeOrAbsolute));
But this doesn't work within App.xaml.cs.
Instead it works by using the below code:
Solution:
(Application.Current.RootVisual as PhoneApplicationFrame).Navigate(new Uri("/MyPage.xaml", UriKind.RelativeOrAbsolute));

Explanation:
Each application has only one Frame. It's this frame that exposes the NavigationService. Therefore, the NavigationService is always accessible via the frame since there's always an instance of it in any Windows Phone app. Since you don't usually instantiate a new NavigationService, it's easy to think that it's a static method. However, it's actually a non-static class that gets instantiated automatically when your app is run. All you're doing in this case is getting the global instance, which is attached to the always-present Frame, and using that to navigate between pages. This means your class does not have to instantiate, or explicitly inherit, a NavigationService.

Saturday 3 August 2013

Windows Phone - How to make TextBlock scrollable

To make your windows phone textbox a scrollable one, just wrap the textbox within a ScrollViewer element. Do not forget to add textwrapping for the textbox. Set the vertical or horizontal scroll settings according to your needs.
<ScrollViewer>
    <TextBlock TextWrapping="Wrap" x:Name="txtbox1">
</TextBlock>
</ScrollViewer>

Sunday 28 July 2013

WPF - How to set width to 100 percent

In WPF if you want to set the width of a UI element to 100%, its a bit different from how you do in HTML. The width cannot be set like width="100%".
As we want the element to take all the width available for it within its parent container we will stretch the control to take all the available space within the parent container. For this we will set the "HorizontalContentAlignment" property of the control to "Stretch"
For example if you want a TextBox to change its width dynamically according to the parent container's width set:
<Textbox HorizontalContentAlignment="Stretch"/>

Set default Window / Page - WPF Application

The default page to be loaded in a WPF application is configured in App.xaml file.
By default the project will have App.xaml file as below:

<Application x:Class="Login_WPF.App" xmlns="http://schemas.microsoft.com/winfx/2006/xaml/presentation" xmlns:x="http://schemas.microsoft.com/winfx/2006/xaml" StartupUri="MainWindow.xaml">
   <Application.Resources></Application.Resources>
</Application>
Here MainWindow.xaml is the default window set by visual studio.
If you want to change the startup window of the WPF app to MyWindow.xaml, update with this xaml file name as below.
<Application x:Class="Login_WPF.App" xmlns="http://schemas.microsoft.com/winfx/2006/xaml/presentation"
xmlns:x="http://schemas.microsoft.com/winfx/2006/xaml" StartupUri="MyWindow.xaml">
   <Application.Resources></Application.Resources>
</Application>

Wednesday 24 July 2013

LongListSelector: item click (Windows Phone)

Use the SelectionChanged event of LongListSelector to handle the item click action. Windows Phone APIs are still young and doesn't have a straight forward and out of the box API to handle the click event yet. But if you use the SelectionChanged event wisely its a good alternative.

in XAML:
<phone:LongListSelector x:Name="LngLstSel" SelectionChanged="LngLstSel_SelectionChanged">

In CodeBehind (C#):
private void LngLstSel_SelectionChanged(object sender, SelectionChangedEventArgs e) {
  // If selected item is null, do nothing
  if (LngLstSel.SelectedItem != null)
  {
  // Place your logic here.

  // Reset selected item to null
  LngLstSel.SelectedItem = null;
  }
}

Just make sure to check that the LongListSelector's SelectedItem property is not null and after doing your actions in the event, set the LongListSelector's SelectedItem property to null. This will clear off the bug that can happen if you want to select the same item consequently, because the event raises when an item selection is changed.

Tuesday 23 July 2013

'VisualTree' is set more than once - Windows Phone Error

The property 'VisualTree' is set more than once.

If you keep getting this error in your windows phone app, it should be from your XAML. If you have a DataTemplate(<DataTemplate>) and if it has more than one child, it throws this exception.
For example:
<ListBox>
 <ListBox.ItemTemplate>
  <DataTemplate>
   <Image Source="{Binding Path=Image}" />
   <TextBlock Text="{Binding Path=Name}" />
  </DataTemplate>
 </ListBox.ItemTemplate>
</ListBox>

Here there are two direct child controls in the DataTemplate - an Image controld and a TextBlock control. The error can be corrected by placing the two controls inside a container control like a StackPanel. So the above code can be converted as below:
<ListBox>
 <ListBox.ItemTemplate>
  <DataTemplate>
    <StackPanel>
   <Image Source="{Binding Path=Image}" />
   <TextBlock Text="{Binding Path=Name}" />
    </StackPanel>
  </DataTemplate>
 </ListBox.ItemTemplate>
</ListBox>

Now it complies with the rules that a DataTemplate can contain only one direct child control.

Monday 22 July 2013

Detecting Current Theme in Windows Phone - Dark or Light

If you stick to the default themes and brushes in windows phone apps, windows phone would adjust the styles according to the user's selection of dark and light theme settings.
But in cases where your app needs to set custom styles for UI elements, you would want to change styles according to the phone's current theme (Dark or Light).
To accomplish this the technique we use is to rely on some of the system default brushes. Once the system theme changes from Dark to Light and vice versa, the color these system brushes refer to changes automatically. In this example we use the PhoneBackgroundBrush. So when the current theme is Dark, PhoneBackgroundBrush's color is black and when the theme is switched to Light, the brush's color automatically change to White.
Code:
SolidColorBrush bgBrush = Application.Current.Resources["PhoneBackgroundBrush"] as SolidColorBrush;
if (bgBrush.Color == Color.White)
{
// current phone theme is Light
}
else
{
// current phone theme is Dark
}
An alternate approach is as below:
var visibility = (Visibility)Resources["PhoneLightThemeVisibility"];
if(visibility == Visibility.Visible)
{
// current phone theme is Light
}
else
{
// current phone theme is Dark
}
Both approaches work well and currently, there is no other straight forward/cleaner api exposed by windows phone for the functionality.